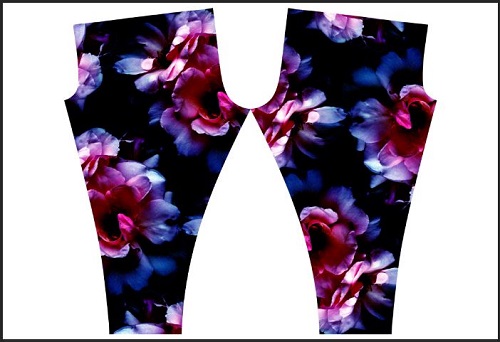
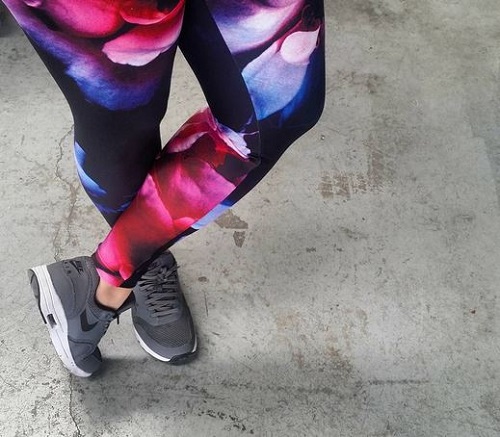
Garment making and production can be daunting and a complicated process especially placement or engineered printing. A lot of time and effort goes into research and understanding where to start. We have put together tutorials on how to design, work with and prepare legging pattern for digital placement fabric printing. For this tutorial you need to be proficient in Photoshop and Illustrator or at least have basic knowlage. Our tutorial is based on industry standards. This technic can be applied to printing other products such as bikinis, t-shirts, singlets , dresses etc.
How to prepare legging pattern for fabric printing in Photoshop
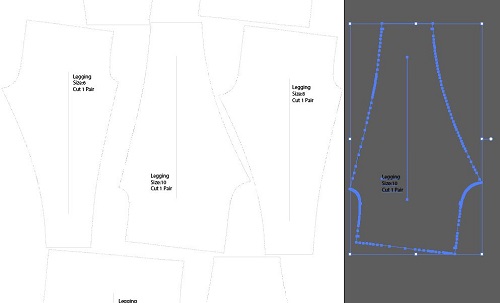
Open the PDF file in Illustrator. You can purchase our digital leggings pattern on our website or use your own.
Copy and paste the size you would like to use within the same file, we have selected size 10.
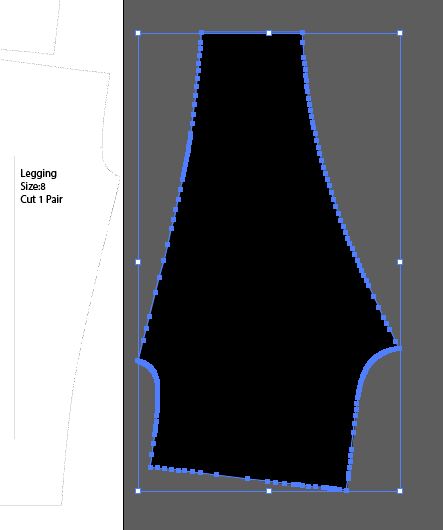
Delete all details and notches within the pattern piece and select the pattern shape and fill in black.
while legging is selected copy and take note on the sizing.
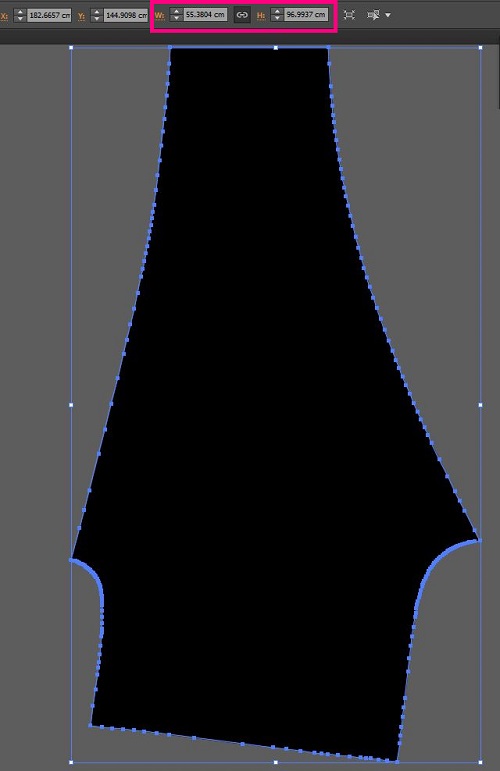
Open Photoshop and select a new artboard, keep the pixels and resolution the same, just make sure you’ve selected RGB color mode. Click OK and Paste pattern piece as a smart object, click enter to place.
Double check that the sizing is correct by selecting Image>image size, in this case it is only a few points off which will be fine.
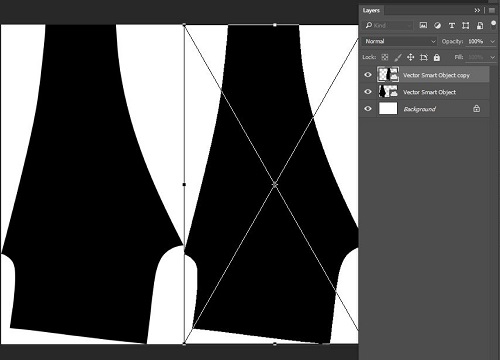
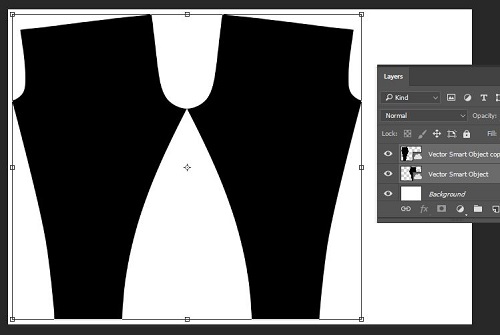
Next you’ll need to increase your artboard size to fit the other leg, change the width of your artboard to the width of the fabric you’d like to use and select the anchor points to extend from corner.
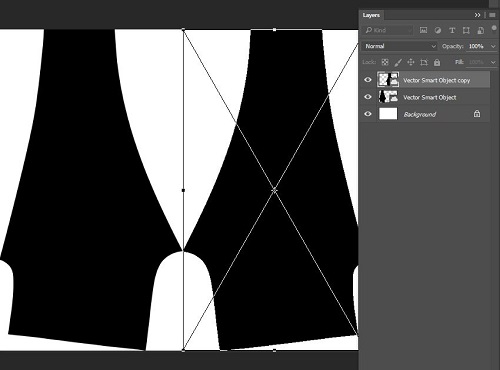
Copy Layer and while selected transform (Ctrl+t), while still selected right click on top of the layer and select Flip Horizontally, you know have a pair.
With both layers selected you will need to select transform again (ctrl+t) and while select cover over to rotate, when rotating make sure you hold down shift to make sure it rotates correctly.
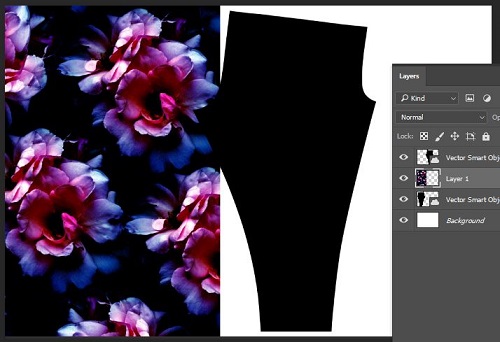
Copy and paste the design you would like on your leggings and place layer on top of the one of the pattern legs.
Right click on the design layer and in the drop down menu select create clipping mask.
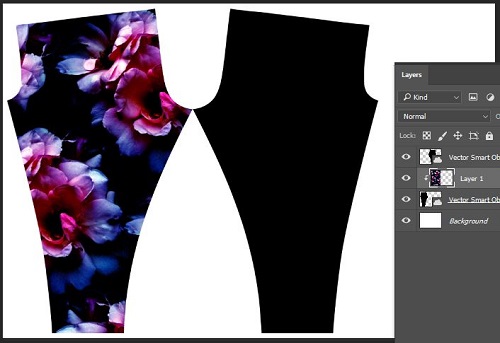
Repeat for other leg
Group all layers and centre.
Your file is now ready to print!
Soon you’ll have your printed fabric which you’ll be able to whip up into these comfy leggings
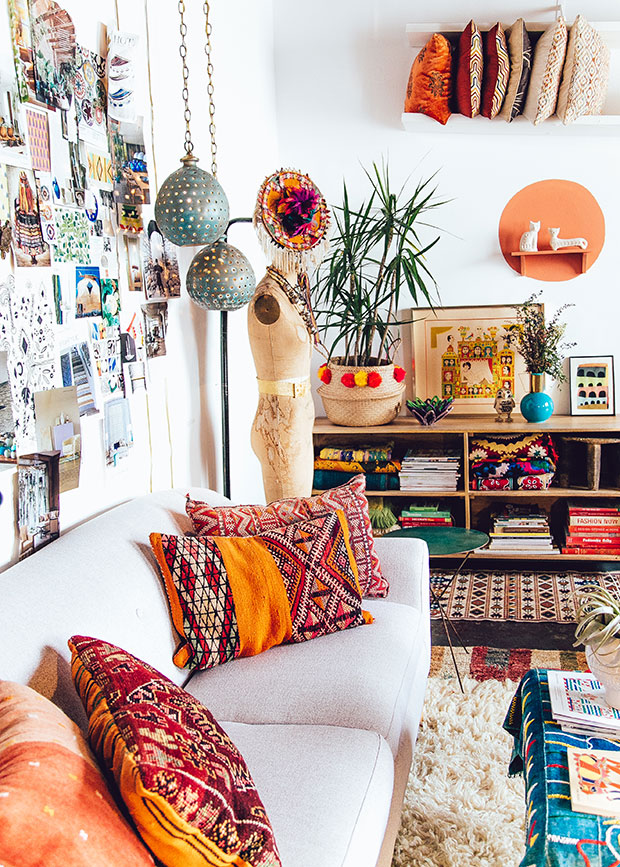
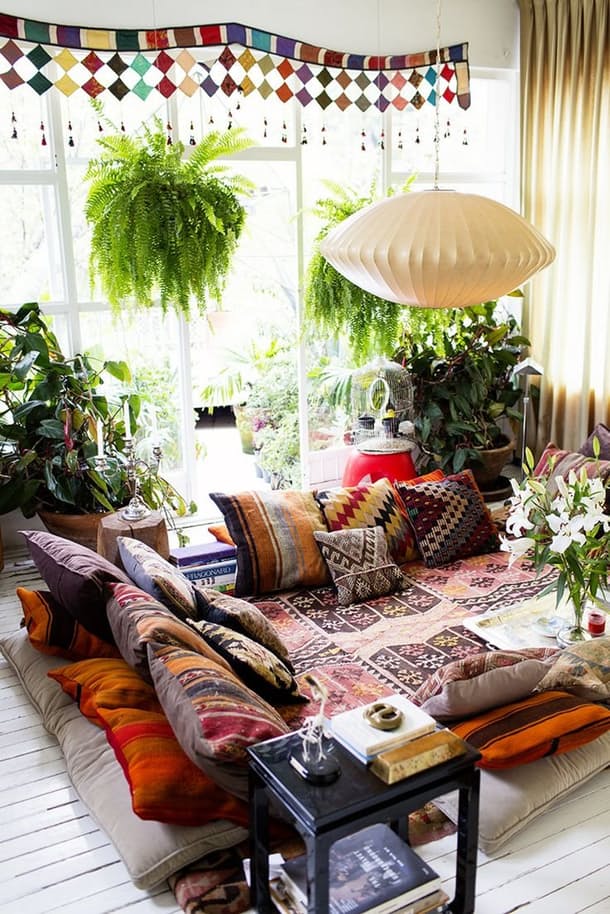
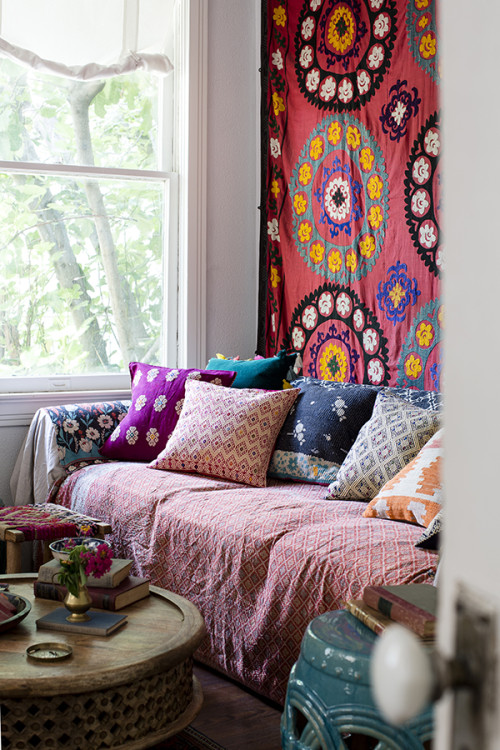
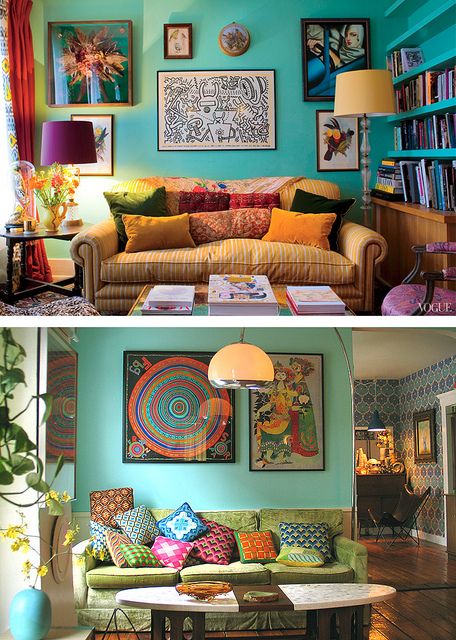
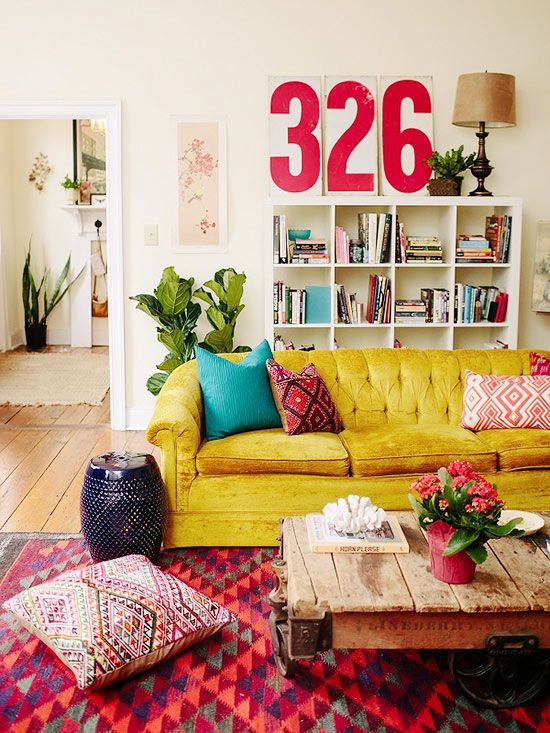
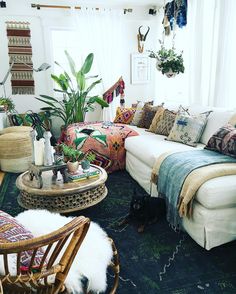
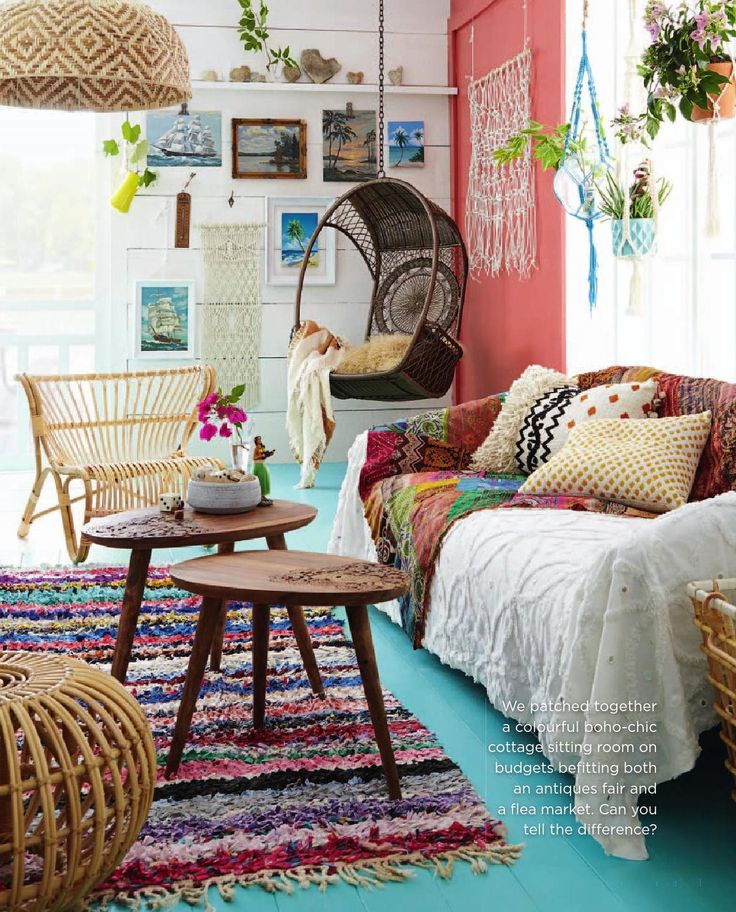
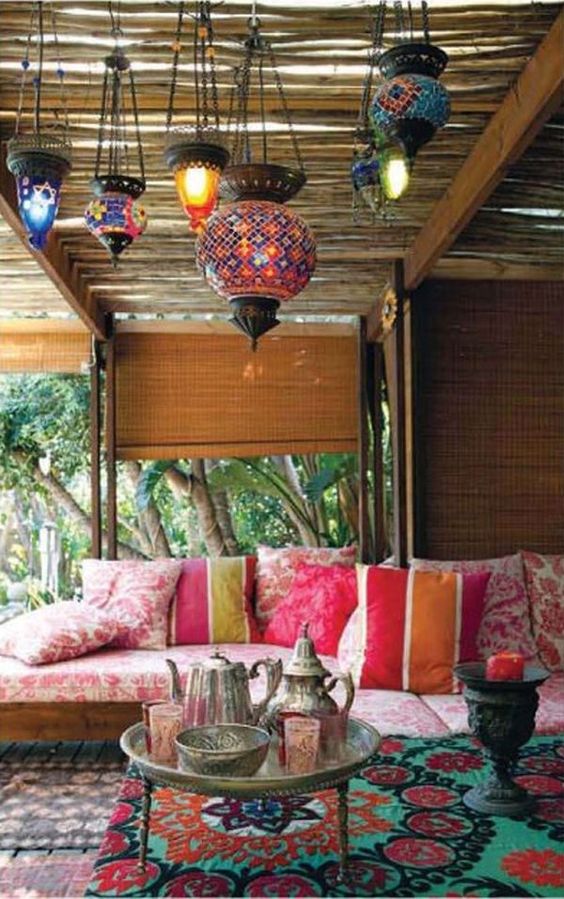
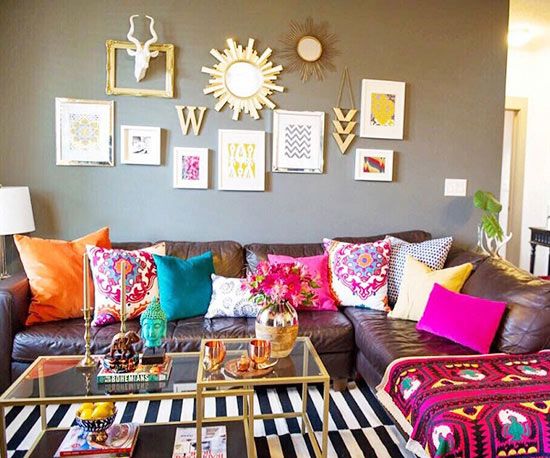
Pinterest is such an inspiring platform and allows us to get so many great ideas for home decor, recipes, DIY and travel. One of the interior design trends that we’re loving is the bohemian design trend. It feels personal, cozy and vintage with worldly influences. With these easy 3 home decor trends you can add a bohemian feel to any small room instantly!
Bohemian Design Tip 1: Colorful Pillows Pillows are a great way to add more color to a room and make it extra cozy. Vary the colors and prints to add more dimension. And if you really want to add a personal touch, make your own cushion or pillow. Print your design, photograph or artwork and create a stylish statement to lighten up any room or make a perfect gift.
Bohemian Design Tip 2: Textiles Give new life to an old couch by layering textiles on them. See our selection of fabrics (also suitable for home decor) in our fabric shop. Contrast it with an eye-catching carpet.
Photo credit: Jungalow Bohemian Design Tip 2: Add plants
Not only are plants great to purify the air, they’re excellent to add more life to your room. And in a bohemian interior, plants are a must.
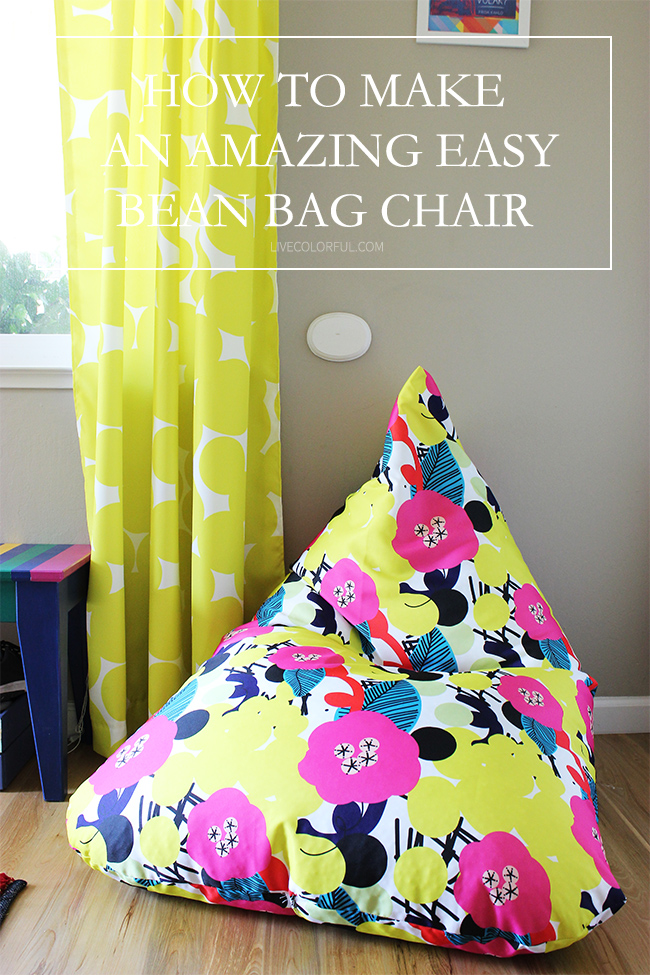
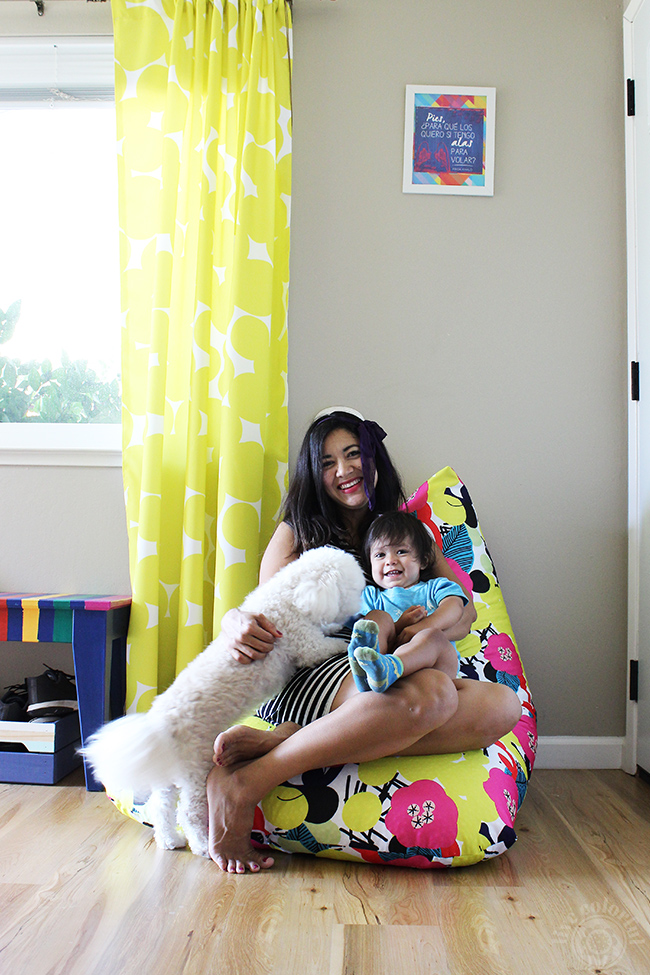
Elba from Live Colorful created another colorful & creative DIY tutorial: a DIY Bean Bag. For this she used the Cheery fabric she designed and which is available in our fabric shop. Did you know that printing fabrics with us is super easy? Create your design, Upload and pay, Receive your fabric!
From DIY clothes to DIY Home Decor, our mission at Digital Fabrics is to help you to bring your creativity and your amazing ideas to life!
Elba got the inspiration for her DIY project from Pinterest, but added some fun curves to make it look more organic.
MATERIALS NEEDED:
2 meters of heavyweight fabric. Waratah drill (147 cm wide). Design: Cheery.
2 packs of bean bag chair refill (100 Liter refill bags)
Pinterest is such an inspiring platform and allows us to get so many great ideas for home decor, recipes, DIY and travel. One of the interior design trends that we’re loving is the bohemian design trend. It feels personal, cozy and vintage with worldly influences. With these easy 3 home decor trends you can add a bohemian feel to any small room instantly!
Bohemian Design Tip 1: Colorful Pillows Pillows are a great way to add more color to a room and make it extra cozy. Vary the colors and prints to add more dimension. And if you really want to add a personal touch, make your own cushion or pillow. Print your design, photograph or artwork and create a stylish statement to lighten up any room or make a perfect gift.
Bohemian Design Tip 2: Textiles Give new life to an old couch by layering textiles on them. See our selection of fabrics (also suitable for home decor) in our fabric shop. Contrast it with an eye-catching carpet.
Photo credit: Jungalow Bohemian Design Tip 2: Add plants
Not only are plants great to purify the air, they’re excellent to add more life to your room. And in a bohemian interior, plants are a must.
Elba from Live Colorful created another colorful & creative DIY tutorial: a DIY Bean Bag. For this she used the Cheery fabric she designed and which is available in our fabric shop. Did you know that printing fabrics with us is super easy? Create your design, Upload and pay, Receive your fabric!
From DIY clothes to DIY Home Decor, our mission at Digital Fabrics is to help you to bring your creativity and your amazing ideas to life!
Elba got the inspiration for her DIY project from Pinterest, but added some fun curves to make it look more organic.
MATERIALS NEEDED:
2 meters of heavyweight fabric. Waratah drill (147 cm wide). Design: Cheery.
2 packs of bean bag chair refill (100 Liter refill bags)
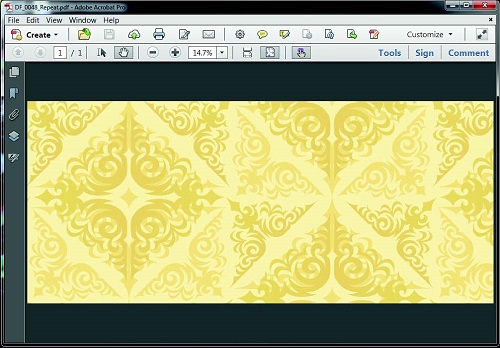
Get your math skills ready for this fabric repeat pattern tutorial in Illustrator. We would recommend to start with repeating simple objects first to understand the concept of repeating pattern in Illustrator, once it is understood nothing will stop you to create!
Full Drop Repeat in Illustrator
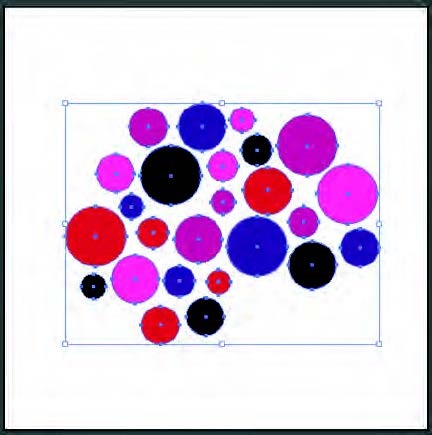
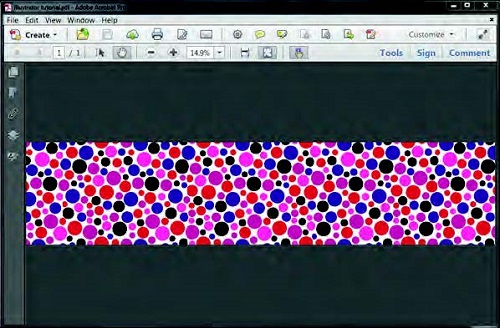
Either open up an existing illustrator file or begin by developing your vector image that you desire to repeat. We have started with a basic spot, varying the size and colour to add variety and this will form the base of the repeat.
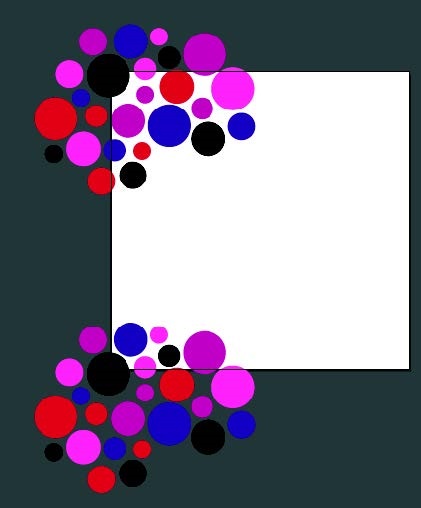
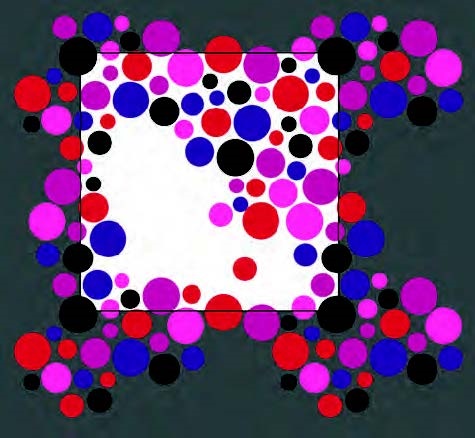
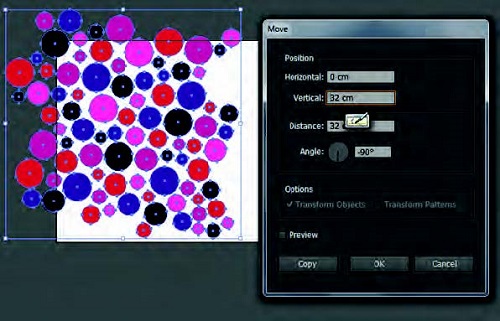
Set up your art board to your desired repeat size. This depends on your end product, but to start off with, work with squares to help with calculations. We have set up my repeat to be 32 x 32 cm. For interested sake, this is a standard rotary repeat set up. Place your initial artwork to the top left corner of the art board, letting it hang over the edge.
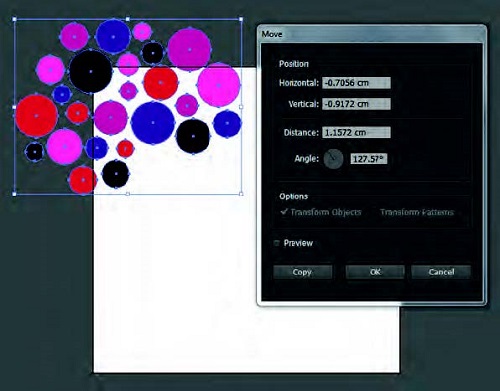
Select all objects (sometimes helpful to group them so you don’t miss any when duplicating). Double click on the black selection tool in the tools panel and a dialogue box will appear.
This is how you can move objects an exact amount i.e. the repeat size and know that all objects within that repeat will align perfectly.
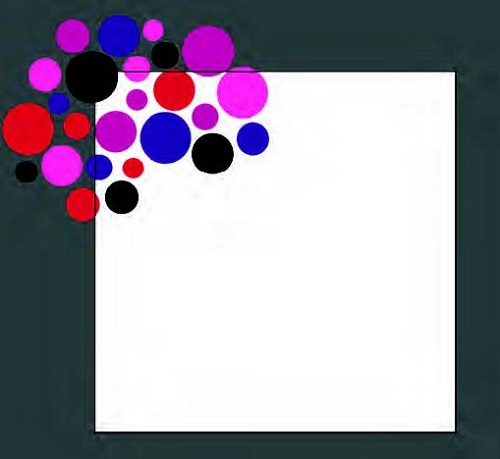
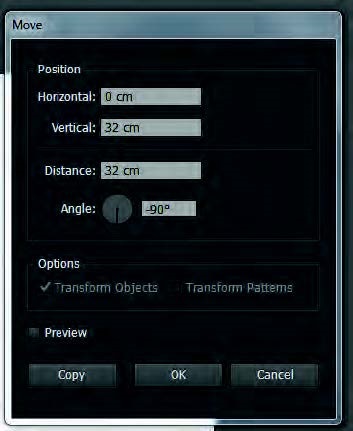
First duplicate the selected objects the repeat size down or vertically. This repeat is 32 cm, so they are moved 32 cm vertically.
Make sure the horizontal value is 0. Click COPY.
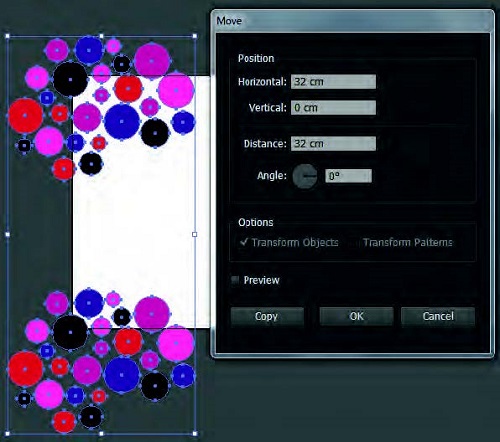
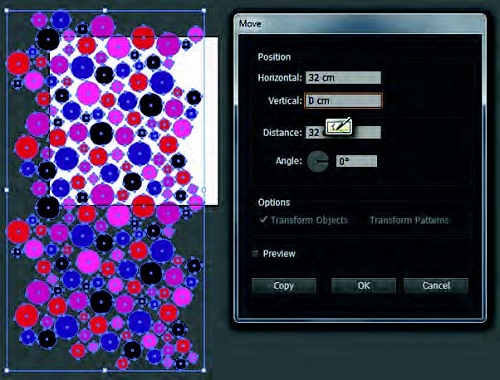
Now repeat horizontally by selecting both groups of objects along the left side. When in the move dialogue box make sure the horizontal value is the repeat size and the vertical value is 0. Click COPY.
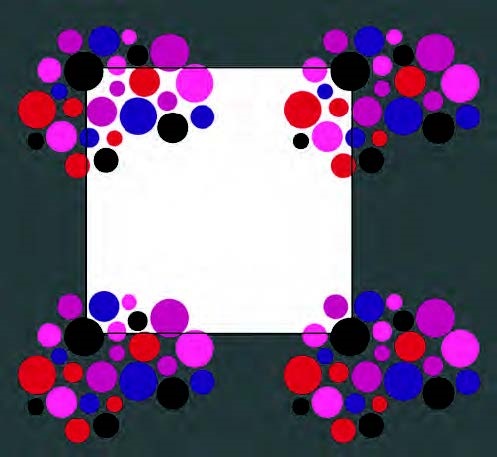
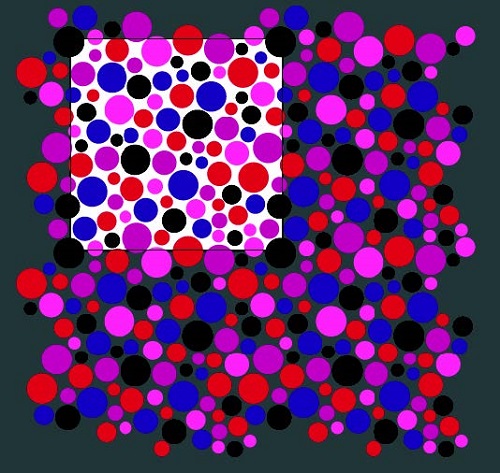
Now is the time to fill in the blank space in the middle with additional objects.
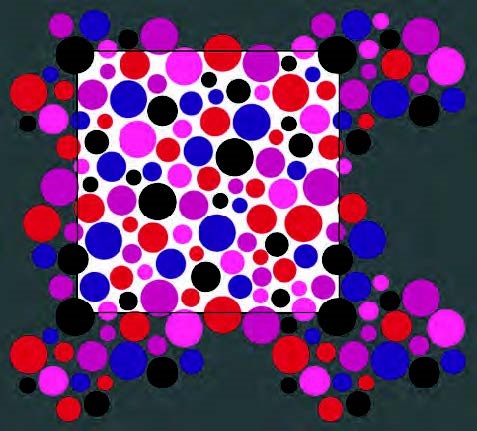
Tip: Lock the three extra sides of the repeat or put them on a separate locked layer so they can be easily deleted in a following step. This may require some more advance knowledge of illustrator, but don’t let this deter you if you are new, it could be helpful in mastering the program! The level of difficulty here will greatly depend on the style and type of original artwork you are using and will call into play several design elements and principles such as space, balance and unity. Watch out for anything that forms a definite line or track mark through your design. You may need to shift or adjust parts of your original artwork to make the repeat work, in which case is can be a good idea to work in layers (with a copy of the original locked) in case you want to jump back to the beginning.
Work towards filling in the edges, duplicating them down/across to the repeat edges, till all you have is the middle to fill.
Continue until you are happy with the flow and feel of the design.
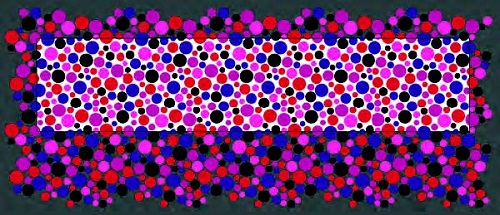
Now delete the three extra sides that were locked or moved to another layer. Then repeat the duplicating sequence with all the added areas/dots of the design. This will help you check anything that may have doubled up or just doesn’t look right in the repeat.
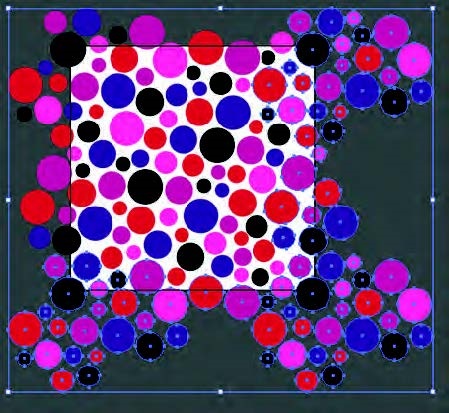
When you are satisfied with your repeat tile, you can set it up for digital fabric printing. Position two repeat tiles (vertically) so they hang over the left side of the art board. Increase the artwork WIDTH to the width of the fabric (in this case 147cm), keep the height of the art board as the repeat size.
Duplicate the selected objects across the width of the art board so it is covered completely. Tip: Once you have used the move tool to move the exact repeat size and clicked copy, ctrl D to duplicate the exact last action.
Save As a PDF. Even though there are objects hanging off the edge of the art board, because they have been moved the exact repeat size, they will all meet up when printed seamlessly. This is now your Full Width Repeat Tile which repeats top and bottom you can use it for digital custom fabric printing.
Using Illustrator for repeats can sometimes be quicker and less labour intensive than using Photoshop, but it all comes down to the type of file you start with or the style of artwork you’re after. Stick to illustrator for vector files and images with a very “graphic” orientation, bearing in mind how the artwork was originally generated. Avoid using a jpg, tiff, psd or Photoshop eps you will lose the inherent quality of the original artwork.
Half Drop Repeat in Illustrator
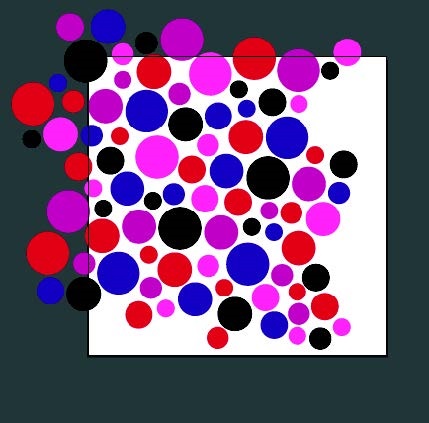
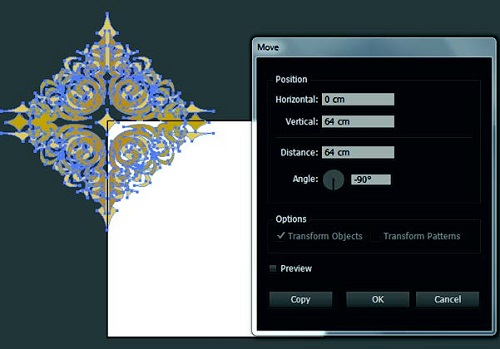
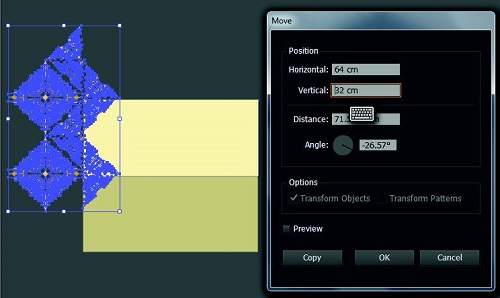
To practise your fabric design skills you can use an existing illustrator artwork. Open up an existing illustrator artwork or create a new vector graphic to your specifications. Set up your art board to the repeat size that you’d prefer. Here I’m using a 64 cm repeat. Starting off with squares can be easier to work out half measurements at a late step.
When you are happy with your artwork, move it to the top left corner of your art board so it hangs off the edge. Double click on the move tool to duplicate (click copy) the object the exact repeat size vertically.
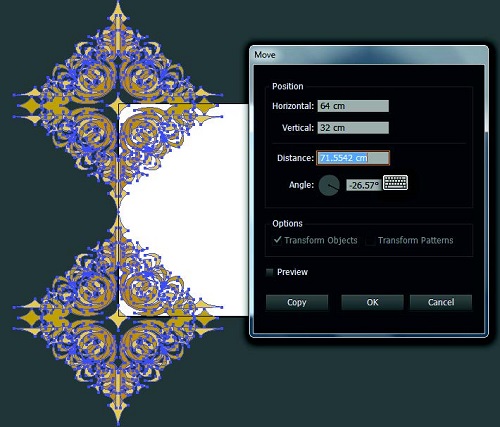
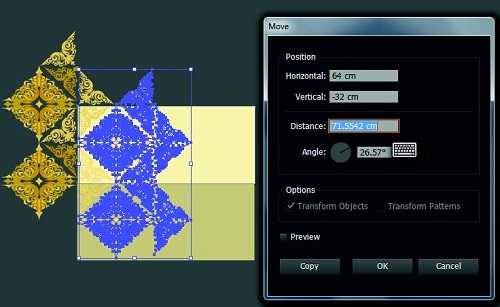
Now with all objects selected, use the move tool again. This time you will duplicate the objects across the full repeat width but down by HALF the repeat size, in this case 64 x 32 cm. Click copy.
At this stage you can adjust the scale of the original object or add in additional motifs. This is not always necessary and depends on your individual artwork but it has the potential to add variety and interest
in the overall design.
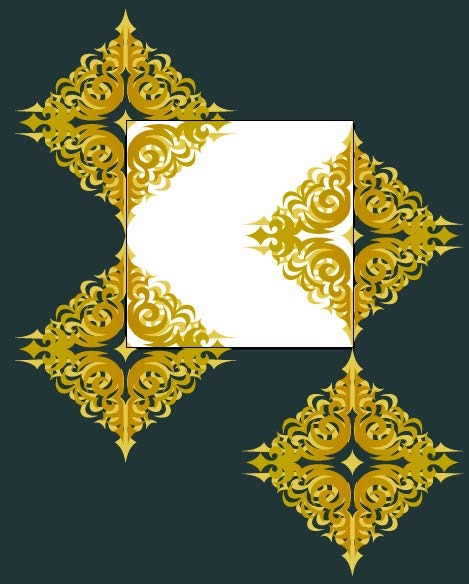
N.B. Don’t forget that what happens on the top ‘line’ of your artboard must happen on the bottom i.e. repeat
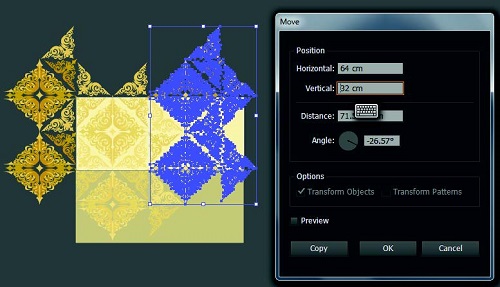
When you are happy with the layout for your half drop, delete any duplicated objects (across the right side and bottom of art board) so that you only have one group of objects.
Adjust the artboard dimension to to be a full print width, in this case 147cm and proceed to duplicate the objects so that it fills and over hangs the artboard. Remember that it is a half drop, so follow the previous steps for duplication.
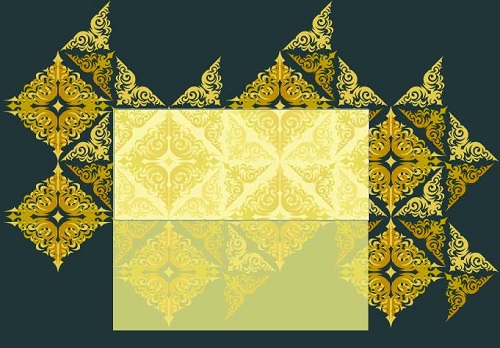
A colour overlay was added purely for aesthetic purposes. Save as pdf as previous tutorial.
Get your math skills ready for this fabric repeat pattern tutorial in Illustrator. We would recommend to start with repeating simple objects first to understand the concept of repeating pattern in Illustrator, once it is understood nothing will stop you to create!
Full Drop Repeat in Illustrator
Either open up an existing illustrator file or begin by developing your vector image that you desire to repeat. We have started with a basic spot, varying the size and colour to add variety and this will form the base of the repeat.
Set up your art board to your desired repeat size. This depends on your end product, but to start off with, work with squares to help with calculations. We have set up my repeat to be 32 x 32 cm. For interested sake, this is a standard rotary repeat set up. Place your initial artwork to the top left corner of the art board, letting it hang over the edge.
Select all objects (sometimes helpful to group them so you don’t miss any when duplicating). Double click on the black selection tool in the tools panel and a dialogue box will appear.
This is how you can move objects an exact amount i.e. the repeat size and know that all objects within that repeat will align perfectly.
First duplicate the selected objects the repeat size down or vertically. This repeat is 32 cm, so they are moved 32 cm vertically.
Make sure the horizontal value is 0. Click COPY.
Now repeat horizontally by selecting both groups of objects along the left side. When in the move dialogue box make sure the horizontal value is the repeat size and the vertical value is 0. Click COPY.
Now is the time to fill in the blank space in the middle with additional objects.
Tip: Lock the three extra sides of the repeat or put them on a separate locked layer so they can be easily deleted in a following step. This may require some more advance knowledge of illustrator, but don’t let this deter you if you are new, it could be helpful in mastering the program! The level of difficulty here will greatly depend on the style and type of original artwork you are using and will call into play several design elements and principles such as space, balance and unity. Watch out for anything that forms a definite line or track mark through your design. You may need to shift or adjust parts of your original artwork to make the repeat work, in which case is can be a good idea to work in layers (with a copy of the original locked) in case you want to jump back to the beginning.
Work towards filling in the edges, duplicating them down/across to the repeat edges, till all you have is the middle to fill.
Continue until you are happy with the flow and feel of the design.
Now delete the three extra sides that were locked or moved to another layer. Then repeat the duplicating sequence with all the added areas/dots of the design. This will help you check anything that may have doubled up or just doesn’t look right in the repeat.
When you are satisfied with your repeat tile, you can set it up for digital fabric printing. Position two repeat tiles (vertically) so they hang over the left side of the art board. Increase the artwork WIDTH to the width of the fabric (in this case 147cm), keep the height of the art board as the repeat size.
Duplicate the selected objects across the width of the art board so it is covered completely. Tip: Once you have used the move tool to move the exact repeat size and clicked copy, ctrl D to duplicate the exact last action.
Save As a PDF. Even though there are objects hanging off the edge of the art board, because they have been moved the exact repeat size, they will all meet up when printed seamlessly. This is now your Full Width Repeat Tile which repeats top and bottom you can use it for digital custom fabric printing.
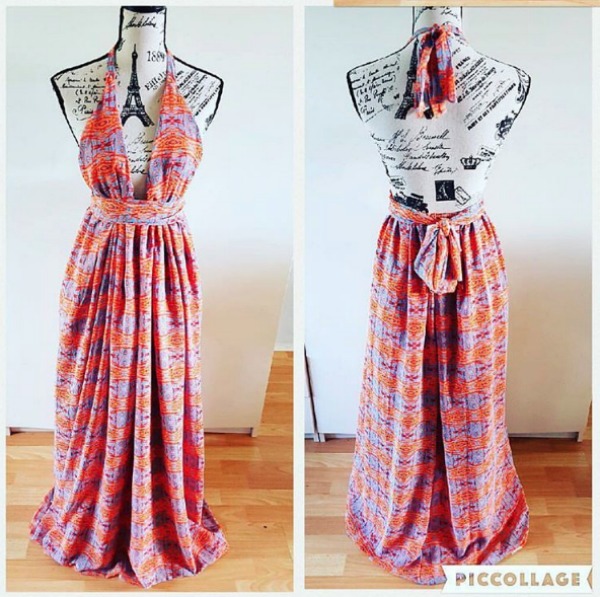
A maxi dress is a wardrobe staple that every woman needs. It’s feminine, easy to wear and DIY.
Ovoke shows us how you can DIY a maxi dress with Digital Fabrics. Our mission at Digital Fabrics is to help you to bring your creativity our amazing ideas to life! Shop this and more fabrics in our Fabric Shop
Using Illustrator for repeats can sometimes be quicker and less labour intensive than using Photoshop, but it all comes down to the type of file you start with or the style of artwork you’re after. Stick to illustrator for vector files and images with a very “graphic” orientation, bearing in mind how the artwork was originally generated. Avoid using a jpg, tiff, psd or Photoshop eps you will lose the inherent quality of the original artwork.
Half Drop Repeat in Illustrator
To practise your fabric design skills you can use an existing illustrator artwork. Open up an existing illustrator artwork or create a new vector graphic to your specifications. Set up your art board to the repeat size that you’d prefer. Here I’m using a 64 cm repeat. Starting off with squares can be easier to work out half measurements at a late step.
When you are happy with your artwork, move it to the top left corner of your art board so it hangs off the edge. Double click on the move tool to duplicate (click copy) the object the exact repeat size vertically.
Now with all objects selected, use the move tool again. This time you will duplicate the objects across the full repeat width but down by HALF the repeat size, in this case 64 x 32 cm. Click copy.
At this stage you can adjust the scale of the original object or add in additional motifs. This is not always necessary and depends on your individual artwork but it has the potential to add variety and interest
in the overall design.
N.B. Don’t forget that what happens on the top ‘line’ of your artboard must happen on the bottom i.e. repeat
When you are happy with the layout for your half drop, delete any duplicated objects (across the right side and bottom of art board) so that you only have one group of objects.
Adjust the artboard dimension to to be a full print width, in this case 147cm and proceed to duplicate the objects so that it fills and over hangs the artboard. Remember that it is a half drop, so follow the previous steps for duplication.
A colour overlay was added purely for aesthetic purposes. Save as pdf as previous tutorial.