Last month we held a very successful class for those keen to learn the Photoshop basics to get their designs on fabric. It was a full class and a big day of discovering the program, having a play and opening up the world of digital fabric printing possibilities to some eager creatives. We all had fun even if there was a lot of material to cover and get a handle on, we can’t wait to see what the students come up with and print in the future!
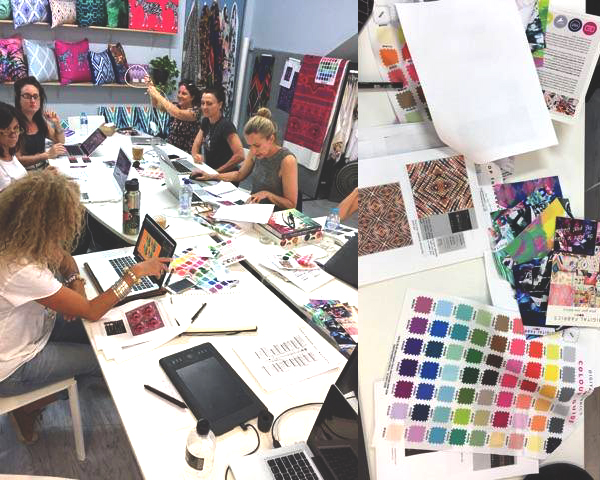
Coming up on December 3 we have another exciting class to get the creative juices flowing and it couldn’t come at a more perfect time of the year. Our Design Your Own Product Workshop gives you a chance to have a play in Photoshop with some of the MANY manipulation options, and turn your photographs or artwork into a product ready for printing and gifting over the festive season. Two gifts in one really, you get the chance to discover the possibilities in Photoshop and learn about digital fabric printing, AND you have the option to have your creation printed at the end. Bonus!
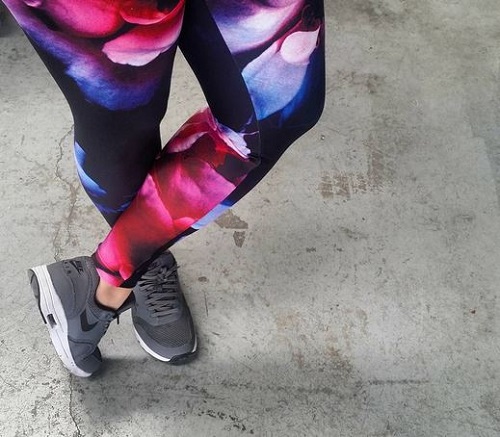
If you’ve been dreaming of our own cushion prints or yoga leggings or even a statement scarf, Design Your Own Product is the workshop for you. This is a one day class focusing on the manipulation options in Photoshop and using these to develop a placement print ready for printing.
There’s no time like the present to design your own unique present! Book online today before the class fills up!
Save
Last month we held a very successful class for those keen to learn the Photoshop basics to get their designs on fabric. It was a full class and a big day of discovering the program, having a play and opening up the world of digital fabric printing possibilities to some eager creatives. We all had fun even if there was a lot of material to cover and get a handle on, we can’t wait to see what the students come up with and print in the future!
Coming up on December 3 we have another exciting class to get the creative juices flowing and it couldn’t come at a more perfect time of the year. Our Design Your Own Product Workshop gives you a chance to have a play in Photoshop with some of the MANY manipulation options, and turn your photographs or artwork into a product ready for printing and gifting over the festive season. Two gifts in one really, you get the chance to discover the possibilities in Photoshop and learn about digital fabric printing, AND you have the option to have your creation printed at the end. Bonus!
If you’ve been dreaming of our own cushion prints or yoga leggings or even a statement scarf, Design Your Own Product is the workshop for you. This is a one day class focusing on the manipulation options in Photoshop and using these to develop a placement print ready for printing.
There’s no time like the present to design your own unique present! Book online today before the class fills up!
Save
 Here at Digital Fabrics over the past few months, we have been testing the education waters by offering some workshops aimed at engaging our customers in the digital printing process, handing over some required designing skills and getting excited about the results from our students. We were so excited that we’ve decided to continue with our DF School offerings and are looking forward to seeing the creations that come out of it!
First class off and running starts this week Thursday, there’s no time to think just do it! Idea to Reality is a four week evening class designed to take you through the fundamentals of what digital printing is and how to develop your artwork into a seamless repeat, ready to be printed for meters and meters. Have you got a design idea burning a hole in your sketchbook? Do you want your very own custom designed and printed fabric for that one of a kind dress? Head on over to our website now to book your spot in our Idea to Reality class!
Next in line there is a one day workshop perfect for Photoshop newbies. Textile Design for Photoshop Beginners will walk you through the basic applications in the Adobe Photoshop program, like where the move tool is and what the magic wand tool can do, before going through some simple repeat set ups that will have you designing your own fabric prints in no time. Ideal for those with little to no experience in Adobe Photoshop, Textile Design for Photoshop Beginners on November 5 is now open for bookings!
If you’ve had a bit of experience working in Photoshop and have been dreaming of your own cushion prints or yoga leggings or even a statement scarf, Design Your Own Product is the workshop for you! Immerse yourself in this one day class focusing on the manipulation options in Photoshop and using these to develop a placement print. With the added option of having your product printed, how can you go past the Design Your Own Product workshop on December 3.
Whichever class you choose, we can’t wait to see you there, share our digital printing insight and be amazed at your creations.
Save
Save
Here at Digital Fabrics over the past few months, we have been testing the education waters by offering some workshops aimed at engaging our customers in the digital printing process, handing over some required designing skills and getting excited about the results from our students. We were so excited that we’ve decided to continue with our DF School offerings and are looking forward to seeing the creations that come out of it!
First class off and running starts this week Thursday, there’s no time to think just do it! Idea to Reality is a four week evening class designed to take you through the fundamentals of what digital printing is and how to develop your artwork into a seamless repeat, ready to be printed for meters and meters. Have you got a design idea burning a hole in your sketchbook? Do you want your very own custom designed and printed fabric for that one of a kind dress? Head on over to our website now to book your spot in our Idea to Reality class!
Next in line there is a one day workshop perfect for Photoshop newbies. Textile Design for Photoshop Beginners will walk you through the basic applications in the Adobe Photoshop program, like where the move tool is and what the magic wand tool can do, before going through some simple repeat set ups that will have you designing your own fabric prints in no time. Ideal for those with little to no experience in Adobe Photoshop, Textile Design for Photoshop Beginners on November 5 is now open for bookings!
If you’ve had a bit of experience working in Photoshop and have been dreaming of your own cushion prints or yoga leggings or even a statement scarf, Design Your Own Product is the workshop for you! Immerse yourself in this one day class focusing on the manipulation options in Photoshop and using these to develop a placement print. With the added option of having your product printed, how can you go past the Design Your Own Product workshop on December 3.
Whichever class you choose, we can’t wait to see you there, share our digital printing insight and be amazed at your creations.
Save
Save
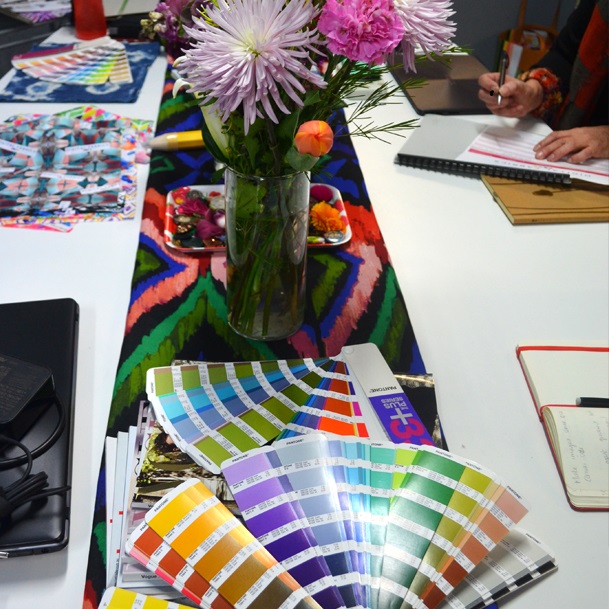
Garment making and production can be daunting and a complicated process especially placement or engineered printing. A lot of time and effort goes into research and understanding where to start. We have put together tutorials on how to design, work with and prepare legging pattern for digital placement fabric printing. For this tutorial you need to be proficient in Illustrator or at least have basic knowlage. Our tutorial is based on industry standards. This technic can be applied to printing other products such as bikinis, t-shirts, singlets , dresses etc.
How to prepare a layout/mark up legging pattern for fabric printing in Photoshop
Once you’ve completed the steps in the tutorial ‘How to use legging pattern in Photoshop’ You may want to print more than 1 design or more than 1 size, the most economic way to do this is to create a mark up/placement layout to have printed.
The following are instructions on how to set up in Photoshop, but could easily be done in Illustrator.
Start off by renaming the pattern layers to insure that you always have a pair of leggings.
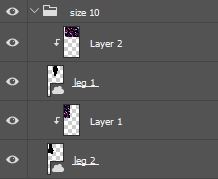
If you are only wanting the same size with different designs you can just Duplicate the leg layers. If you’d like to bring in different sizes you will need to repeat the steps in ‘How to use legging pattern in Photoshop’
In this tutorial we will be using the same size 10 but printing in new designs.
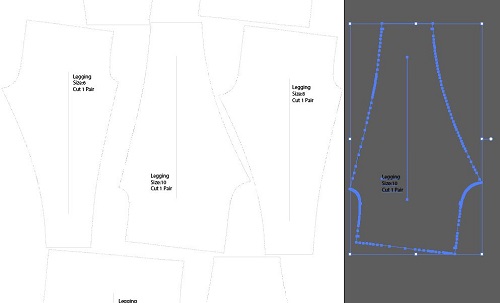
On the same artboard move files to the left hand side. you will notice that you can only comfortable fit 1 pair within the 147cm width with the current orientation; however there is a lot of wastage as illustrator below.
Like a Jigsaw puzzle you will now need to start moving the patterns, you will need to make sure that you keep in mind that your grain line is parallel to the selvage. To do this, select the leg you’d like to rotate (select both layers) press Ctrl+t to open up the transform tool and while holding down shift rotate the image 360′ and make sure to move the pattern piece as close as possible to other leg (zoom in to make sure it is not overlapping)

You can now start bringing in the other size 10 designs and play around with the layout. It’s best that you make the art board slightly longer than needed and once you’ve set up all the designs crop the excess.
Make sure you zoom in and double check that you haven’t overlapped any areas, when you are happy with the layout save as a JPG, TIFF or PDF.

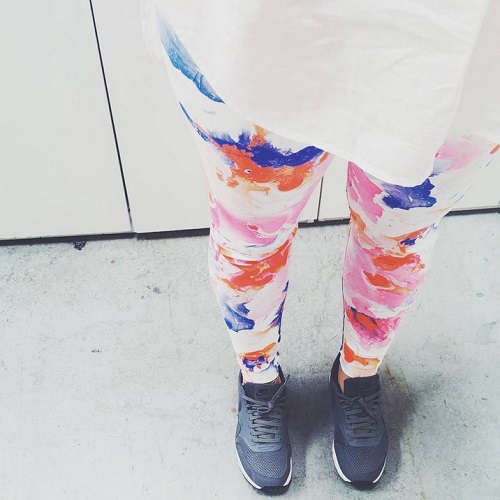
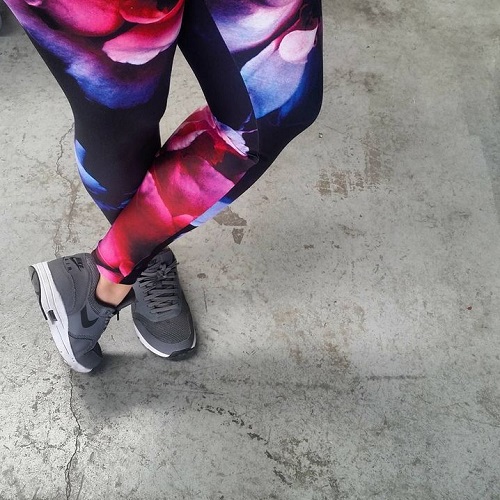
You’re now on your way to have custom printed fabric which you will be able to make into comfy leggings.
Save
Save
Garment making and production can be daunting and a complicated process especially placement or engineered printing. A lot of time and effort goes into research and understanding where to start. We have put together tutorials on how to design, work with and prepare legging pattern for digital placement fabric printing. For this tutorial you need to be proficient in Photoshop and Illustrator or at least have basic knowlage. Our tutorial is based on industry standards. This technic can be applied to printing other products such as bikinis, t-shirts, singlets , dresses etc.
How to prepare legging pattern for fabric printing in Photoshop
Open the PDF file in Illustrator. You can purchase our digital leggings pattern on our website or use your own.
Copy and paste the size you would like to use within the same file, we have selected size 10.
Delete all details and notches within the pattern piece and select the pattern shape and fill in black.
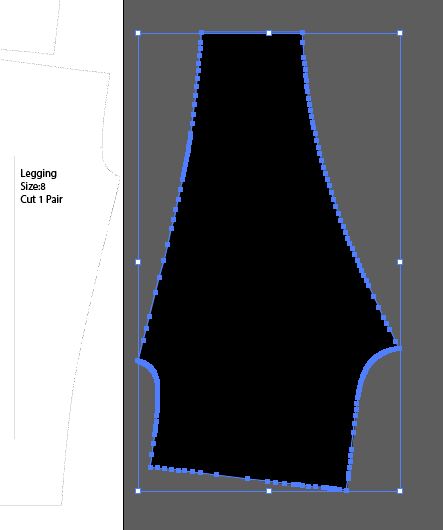
while legging is selected copy and take note on the sizing.
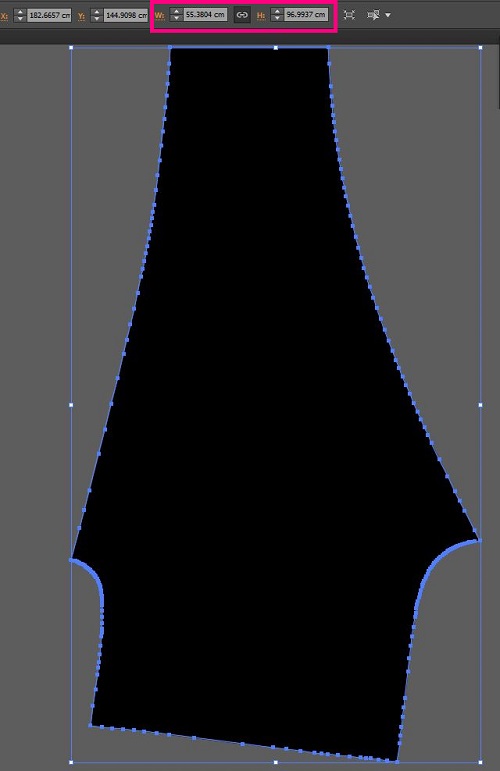
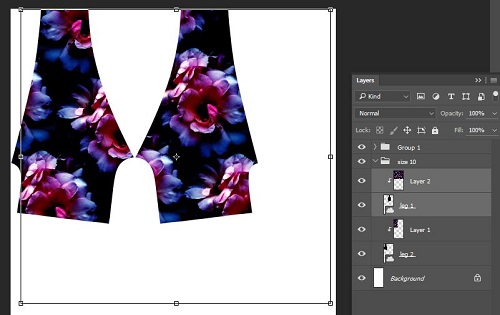
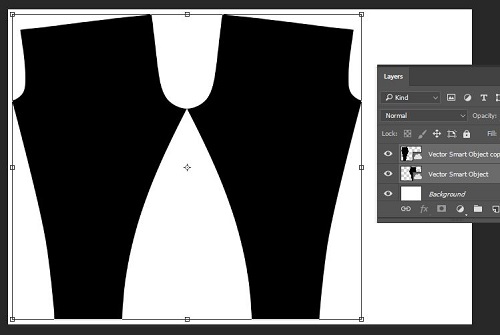
Open Photoshop and select a new artboard, keep the pixels and resolution the same, just make sure you’ve selected RGB color mode. Click OK and Paste pattern piece as a smart object, click enter to place.
Double check that the sizing is correct by selecting Image>image size, in this case it is only a few points off which will be fine.

Next you’ll need to increase your artboard size to fit the other leg, change the width of your artboard to the width of the fabric you’d like to use and select the anchor points to extend from corner.

Copy Layer and while selected transform (Ctrl+t), while still selected right click on top of the layer and select Flip Horizontally, you know have a pair.
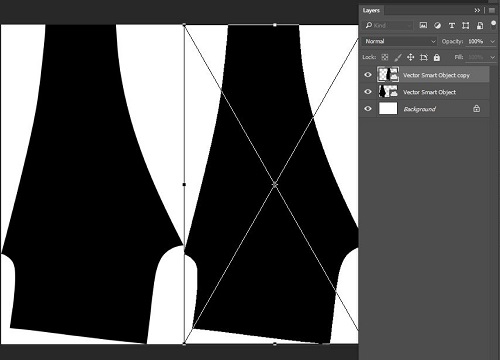
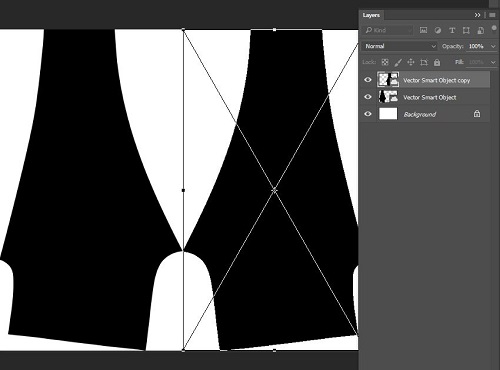
With both layers selected you will need to select transform again (ctrl+t) and while select cover over to rotate, when rotating make sure you hold down shift to make sure it rotates correctly.
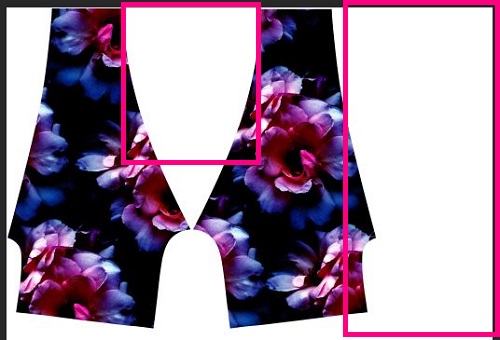
Copy and paste the design you would like on your leggings and place layer on top of the one of the pattern legs.
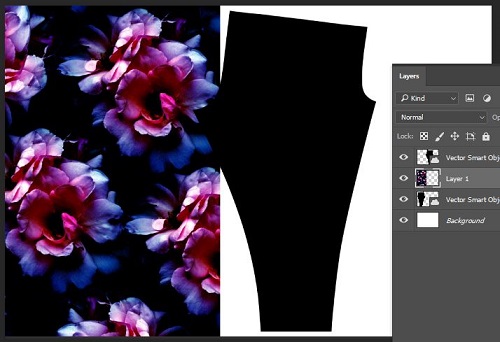
Right click on the design layer and in the drop down menu select create clipping mask.

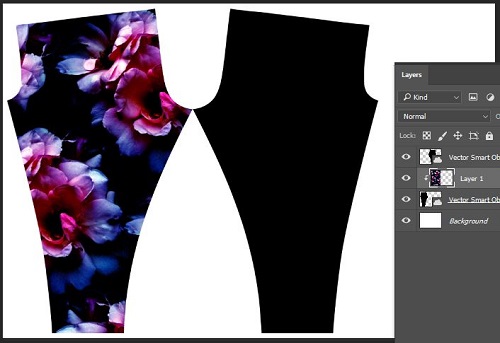
Repeat for other leg
Group all layers and centre.
Your file is now ready to print!
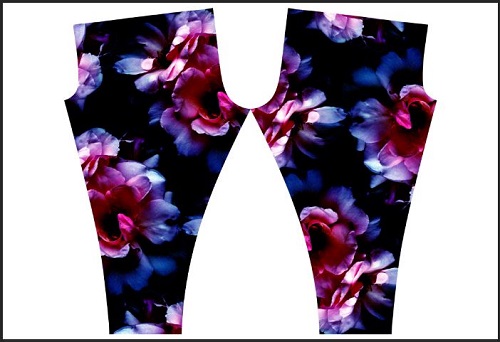
Soon you’ll have your printed fabric which you’ll be able to whip up into these comfy leggings
Save
Garment making and production can be daunting and a complicated process especially placement or engineered printing. A lot of time and effort goes into research and understanding where to start. We have put together tutorials on how to design, work with and prepare legging pattern for digital placement fabric printing. For this tutorial you need to be proficient in Illustrator or at least have basic knowlage. Our tutorial is based on industry standards. This technic can be applied to printing other products such as bikinis, t-shirts, singlets , dresses etc.
How to prepare a layout/mark up legging pattern for fabric printing in Photoshop
Once you’ve completed the steps in the tutorial ‘How to use legging pattern in Photoshop’ You may want to print more than 1 design or more than 1 size, the most economic way to do this is to create a mark up/placement layout to have printed.
The following are instructions on how to set up in Photoshop, but could easily be done in Illustrator.
Start off by renaming the pattern layers to insure that you always have a pair of leggings.
If you are only wanting the same size with different designs you can just Duplicate the leg layers. If you’d like to bring in different sizes you will need to repeat the steps in ‘How to use legging pattern in Photoshop’
In this tutorial we will be using the same size 10 but printing in new designs.
On the same artboard move files to the left hand side. you will notice that you can only comfortable fit 1 pair within the 147cm width with the current orientation; however there is a lot of wastage as illustrator below.
Like a Jigsaw puzzle you will now need to start moving the patterns, you will need to make sure that you keep in mind that your grain line is parallel to the selvage. To do this, select the leg you’d like to rotate (select both layers) press Ctrl+t to open up the transform tool and while holding down shift rotate the image 360′ and make sure to move the pattern piece as close as possible to other leg (zoom in to make sure it is not overlapping)
You can now start bringing in the other size 10 designs and play around with the layout. It’s best that you make the art board slightly longer than needed and once you’ve set up all the designs crop the excess.
Make sure you zoom in and double check that you haven’t overlapped any areas, when you are happy with the layout save as a JPG, TIFF or PDF.
You’re now on your way to have custom printed fabric which you will be able to make into comfy leggings.
Save
Save
Garment making and production can be daunting and a complicated process especially placement or engineered printing. A lot of time and effort goes into research and understanding where to start. We have put together tutorials on how to design, work with and prepare legging pattern for digital placement fabric printing. For this tutorial you need to be proficient in Photoshop and Illustrator or at least have basic knowlage. Our tutorial is based on industry standards. This technic can be applied to printing other products such as bikinis, t-shirts, singlets , dresses etc.
How to prepare legging pattern for fabric printing in Photoshop
Open the PDF file in Illustrator. You can purchase our digital leggings pattern on our website or use your own.
Copy and paste the size you would like to use within the same file, we have selected size 10.
Delete all details and notches within the pattern piece and select the pattern shape and fill in black.
while legging is selected copy and take note on the sizing.
Open Photoshop and select a new artboard, keep the pixels and resolution the same, just make sure you’ve selected RGB color mode. Click OK and Paste pattern piece as a smart object, click enter to place.
Double check that the sizing is correct by selecting Image>image size, in this case it is only a few points off which will be fine.
Next you’ll need to increase your artboard size to fit the other leg, change the width of your artboard to the width of the fabric you’d like to use and select the anchor points to extend from corner.
Copy Layer and while selected transform (Ctrl+t), while still selected right click on top of the layer and select Flip Horizontally, you know have a pair.
With both layers selected you will need to select transform again (ctrl+t) and while select cover over to rotate, when rotating make sure you hold down shift to make sure it rotates correctly.
Copy and paste the design you would like on your leggings and place layer on top of the one of the pattern legs.
Right click on the design layer and in the drop down menu select create clipping mask.
Repeat for other leg
Group all layers and centre.
Your file is now ready to print!
Soon you’ll have your printed fabric which you’ll be able to whip up into these comfy leggings
Save
Whether it’s Summer or Winter, a scarf is a timeless wardrobe essential that can come in handy anytime. Whether you want to bundle up during Winter time, tie it as a beach cover up or create a fancy hair up do, there is no limit to the many ways you can wear and style a scarf.
So why not customize your own scarf and create a beautiful and unique design for it?
Our mission at Digital Fabrics is to help you to bring your creativity and your amazing ideas to life!
September 15 Digital Fabrics will teach you how to design your own scarf. During this full day design your own scarf workshop we will provide you with knowledge of digital textile design for placement printing. You will be photographing floral inspired collage/layout and transferring your photography to a scarf! After the workshop you will receive printed large chiffon scarf with your own design!
Click here to participate in this creative scarf workshop.
Here are 8 fun, colorful scarves as inspiration to get you started!
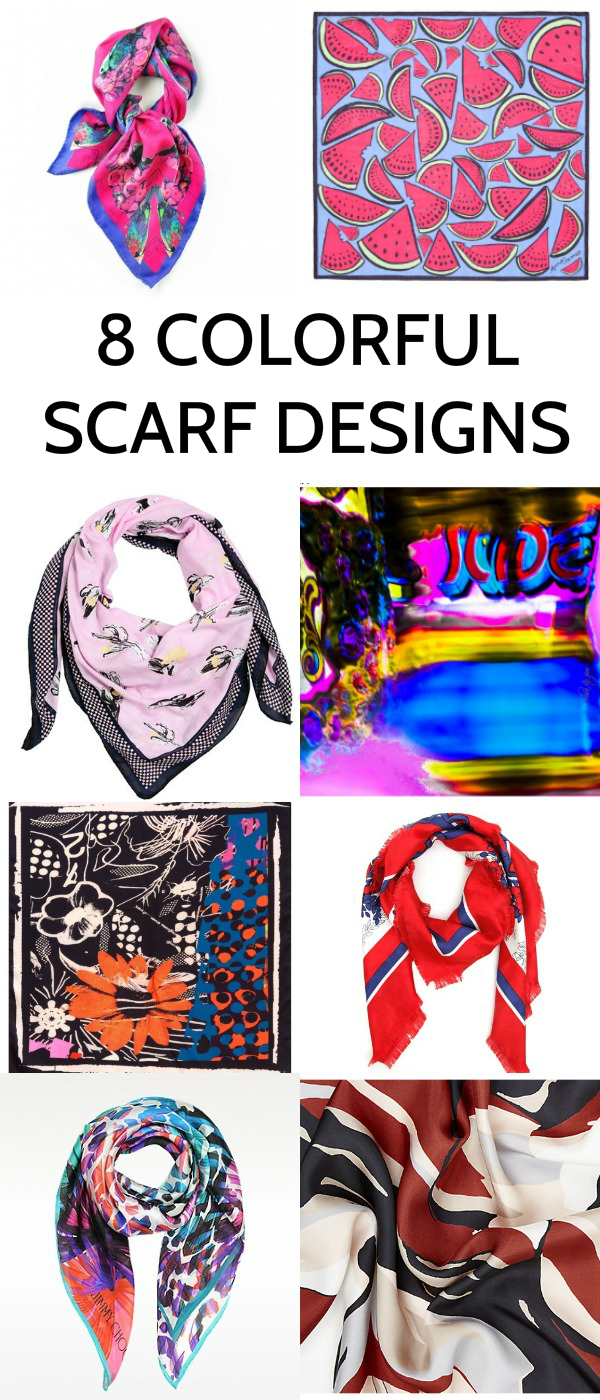
From top left to right bottom
Square Scarf Fushia Chorus – Anna Coronea Watermelon Print Silk Scarf – Cactus printed cotton scarf – Graffiti Square Scarf – Bianca Elgar Orange Flowers Large Square Scarf – Gucci Printed Jacquard Silk Foulard – JIMMY CHOO Palm Print Pure Silk Square Scarf – Hobbs Jessica Silk Scarf, Multi
Whether it’s Summer or Winter, a scarf is a timeless wardrobe essential that can come in handy anytime. Whether you want to bundle up during Winter time, tie it as a beach cover up or create a fancy hair up do, there is no limit to the many ways you can wear and style a scarf.
So why not customize your own scarf and create a beautiful and unique design for it?
Our mission at Digital Fabrics is to help you to bring your creativity and your amazing ideas to life!
September 15 Digital Fabrics will teach you how to design your own scarf. During this full day design your own scarf workshop we will provide you with knowledge of digital textile design for placement printing. You will be photographing floral inspired collage/layout and transferring your photography to a scarf! After the workshop you will receive printed large chiffon scarf with your own design!
Click here to participate in this creative scarf workshop.
Here are 8 fun, colorful scarves as inspiration to get you started!
From top left to right bottom
Square Scarf Fushia Chorus – Anna Coronea Watermelon Print Silk Scarf – Cactus printed cotton scarf – Graffiti Square Scarf – Bianca Elgar Orange Flowers Large Square Scarf – Gucci Printed Jacquard Silk Foulard – JIMMY CHOO Palm Print Pure Silk Square Scarf – Hobbs Jessica Silk Scarf, Multi