Tag Archives: diy with digital fabric

Check your artwork repeats seamlessly with Offset Filter in Photoshop.

  • Open your file in Photoshop. Main menu > File > Open
  • Check size of your image. Main menu > Image > Image size. Take note of the pixel dimension (PX) at the full resolution size.

How to design fabric_Digital Fabrics _textile design

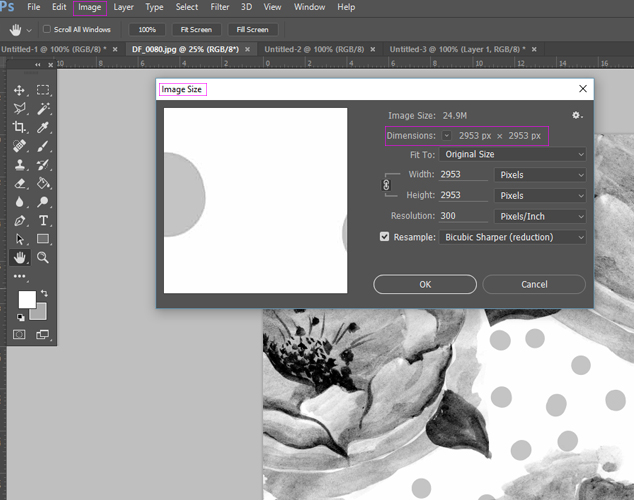
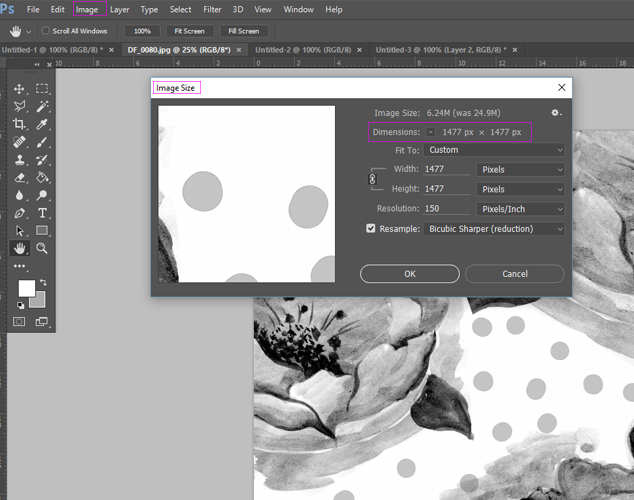
  • Change the resolution to half of its value and take note of the changed pixel dimension. Keep these numbers handy as you will need them to offset your artwork. Don’t click OK at this stage, as you don’t want to change the resolution size, you only need the pixel information.

How to design fabric_Digital Fabrics _textile design tutorial

  • Once you have pixel dimensions noted you can offset and check your file for seamless repeat. Go to Main menu > Filter > Other > Offset. In the open box enter that half pixel values that you have noted down. Select option Wrap Around and tick the Preview option, so you can preview what is happening to your artwork. The side edges of the artwork will now be visible in the middle and the middle will become the sides. In other words the artworks sides got folded into the middle.

How to design fabric_Digital Fabrics _textile design_surface pattern

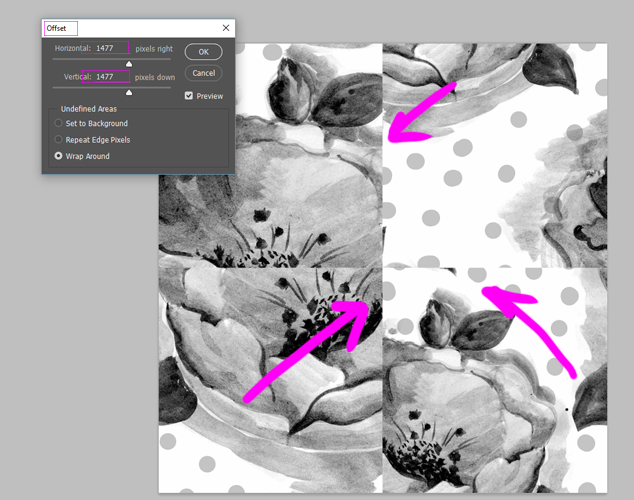
  • If your artwork in not in seamless repeat, you will see it in the middle of your artwork, through vertically and horizontally missed joins and miss matched lines. In some artwork this will not be obvious and you will need to zoom right in to the joining pixels to spot the issue.

How to design fabric_Digital Fabrics _textile design_surface pattern_pattern bank

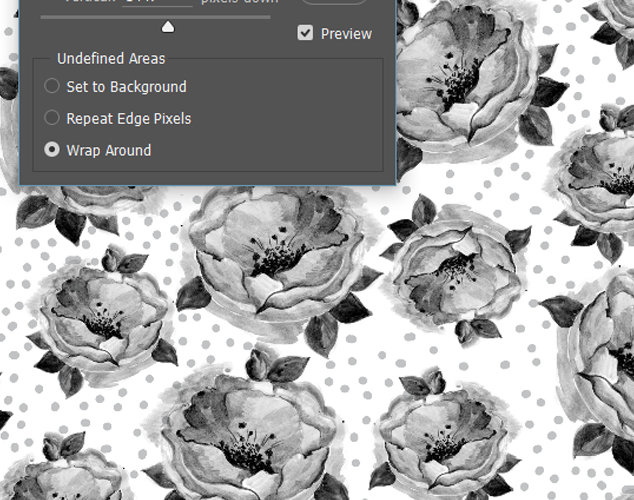
  • When your artwork repeats seamlessly, there is no miss matched lines and elements of the artwork flows seamlessly.

________________________________________

If you are at the beginning of your textile and surface design journey you might want to consider our workshops and classes on offer or continue learning more online through our available tutorials.

Textile Collection Memphis Summer

Here at Digital Fabrics we have a very exciting textile collection to launch just before the end of the year, with a really fun range of fabric prints to get you through Summer. The designs are inspired by dynamic and quirky Memphis design surface patterns and uses contrasting colours, shapes and textures to create playful designs that can be used together or on their own.  

BoldTextileCollection_DigitalFabrics_BrightFabricDesign_1

BoldTextileCollection_DigitalFabrics_BrightFabricDesign_2

All of the print designs started out on paper! By using different mark making processes with a variety of materials such as markers, paints, pens and sponges, graphic shapes and surfaces began to emerge. These were then dissected and collaged together to create interesting designs with lots of energy.

BoldTextileCollection_DigitalFabrics_BrightFabricDesign_5

BoldTextileCollection_DigitalFabrics_BrightFabricDesign_7

Colour is such a key component of this collection and it was really important to get them right. We combined very on trend pastel shades, with timeless neutrals, and whites to contrast with bold blacks and splashes of electric warm colours. 

BoldTextileCollection_DigitalFabrics_BrightFabricDesign_9

BoldTextileCollection_DigitalFabrics_BrightFabricDesign_8

The Memphis Summer Collection is perfect to get those creative juices flowing over the next few months! Whether it’s making something in time for an event over the festive season or it’s because you’ve finally some free time to work on a DIY project, Digital Fabrics can help out with your fabric printing needsWe see these designs working for both interiors and fashion, with statement cushions and fabulous Summer dresses being the first things that come to mind! 

The Memphis Summer Collection is available for purchase in our Design Library!


Textile Collection Artful Simplicity

We’re very excited here at Digital Fabrics to be dropping another range of yummy prints! This time we’re inspired by bold earthy colours and organic forms, bringing to you a collection of hand painted, textural abstract designs.

DigitalFabrics_CustomPrinting_Moodboard_Inspiration_ArtfulSimplicity

HandpaintedGeometrics_DigitalFabrics_FabricDesigns_3

Our Sunset Gum design is a small scale abstract print with bold contrasting colours. Who doesn’t love a splash of red?

BlushPebble_CustomFabricPrinting_DigitalFabrics_HandpaintedGeometricDesigns

Our Blush Pebble design is a medium scale graphic print. We just can’t get enough of pink!

HandpaintedGeometrics_DigitalFabrics_FabricDesigns_5


OchreScatter_CustomFabricPrinting_DigitalFabrics_HandpaintedGeometricDesigns

Our Ochre Scatter design is a small scale print with a fabulous burnt vermilion colourway, able to liven up any space or outfit!

HandpaintedGeometrics_DigitalFabrics_FabricDesigns_6

Our Clay design is a medium scale print with bold geometric shapes and a deep warm colour palette.

The Artful Simplicity collection is available for purchase in our Design Library. We can’t wait to see what you do with them!

How to prepare a layout legging pattern for fabric printing in Photoshop

Garment making and production can be daunting and a complicated process especially placement or engineered printing. A lot of time and effort goes into research and understanding where to start. We have put together tutorials on how to design, work with and prepare legging pattern for digital placement fabric printing. For this tutorial  you need to be proficient in Illustrator or at least have basic knowlage. Our tutorial is based on industry standards. This technic can be applied to printing other products such as bikinis, t-shirts, singlets , dresses etc.

How to prepare a layout/mark up legging pattern for fabric printing in Photoshop

Once you’ve completed the steps in the tutorial ‘How to use legging pattern in Photoshop’ You may want to print more than 1 design or more than 1 size, the most economic way to do this is to create a mark up/placement layout to have printed.

The following are instructions on how to set up in Photoshop, but could easily be done in Illustrator.

Start off by renaming the pattern layers to insure that you always have a pair of leggings.

layer_photoshop_markup_design_fabric_legging_printing

If you are only wanting the same size with different designs you can just Duplicate the leg layers. If you’d like to bring in different sizes you will need to repeat the steps in ‘How to use legging pattern in Photoshop’

In this tutorial we will be using the same size 10 but printing in new designs.

On the same artboard move files to the left hand side. you will notice that you can only comfortable fit 1 pair within the 147cm width with the current orientation; however there is a lot of wastage as illustrator below.

legging_layout_printing_fabric_design

Like a Jigsaw puzzle you will now need to start moving the patterns, you will need to make sure that you keep in mind that your grain line is parallel to the selvage. To do this, select the leg you’d like to rotate (select both layers) press Ctrl+t to open up the transform tool and while holding down shift rotate the image 360′ and make sure to move the pattern piece as close as possible to other leg (zoom in to make sure it is not overlapping)

tutorial_layout_markup_printing

markup_fashion_layout_tutorial_leggings_bold_rose

You can now start bringing in the other size 10 designs and play around with the layout. It’s best that you make the art board slightly longer than needed and once you’ve set up all the designs crop the excess.

Make sure you zoom in and double check that you haven’t overlapped any areas, when you are happy with the layout save as a JPG, TIFF or PDF.

layout_legging_tutorial_polish_abstract_orchid_black_white_bold_rose_floral_sports_luxe

You’re now on your way to have custom printed fabric which you will be able to make into comfy leggings.

design-your-own-leggings-digital-fabrics-class create-your-own-activewear-design-leggings-digital-fabrics-classes

Save

Save

DIY with Digital Fabrics – The Sara Project

digital fabrics the sara project print your own fabric
“The fabric is so soft, and the print is bright and bold; really great quality! I love how unique my top feels in this fresh print.”
– The Sara Project

The beauty about fabrics is seeing them come to life whether it becomes a pillow cover or a unique piece of clothing. Digital Fabrics recently teamed up with Sara from The Sara Project who loves to share her passion for sewing on her blog.

digital fabrics the sara project print your own fabric
Sara used our Ethnic in Cornflower in micro fabric to create this unique top. It’s fresh, flown and this top can definitely be worn during all seasons. And we’re happy to read she was pleased with the fast shipping and quality of the Digital Fabrics she received

digital fabrics the sara project print your own fabric digital fabrics the sara project print your own fabric